Cppxfel spot finding: Difference between revisions
(image widths) |
mNo edit summary |
||
| Line 22: | Line 22: | ||
[[File:cppxfel_dials_threshold_before.png|300px]] | [[File:cppxfel_dials_threshold_before.png|300px]] | ||
(example of threshold image before playing around with DIALS spot-finding parameters) | (example of threshold image before playing around with DIALS spot-finding parameters) | ||
| Line 31: | Line 32: | ||
[[File:cppxfel_dials_spot_finding_parameters.png|300px]] | [[File:cppxfel_dials_spot_finding_parameters.png|300px]] | ||
These are the parameters you want to change. | These are the parameters you want to change. | ||
[[File:cppxfel_dials_after_threshold.png|300px]] | [[File:cppxfel_dials_after_threshold.png|300px]] | ||
These are the spots you want to see on the "threshold" image, with the minimum noise possible while still picking up as many spots as possible. | These are the spots you want to see on the "threshold" image, with the minimum noise possible while still picking up as many spots as possible. | ||
Latest revision as of 01:55, 4 May 2016
This page is under development!
Cppxfel currently uses DIALS to find spots on individual images. This tutorial explains how to determine a suitable set of parameters to put into the find_spots.options file (mentioned during the tutorial on [Cppxfel Indexing with DIALS])) using the DIALS GUI.
We will choose an image to focus on: shot-s00-20130316171711930.pickle.
Loading the image into DIALS
To load the image into the DIALS GUI, you can type:
dials.image_viewer shot-s00-20130316171711930.pickle
Adjusting the brightness
This opens up a window which displays the image and a number of controls. The first task is to adjust the brightness until the background of the image is significantly lighter than the signal of the spots. This is adjusted using the "brightness" bar. A brightness of 20 works well for the image above.
Viewing the threshold image
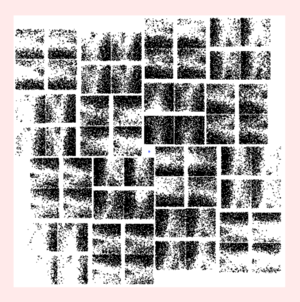
DIALS spot-finding occurs in a series of stages which finishes with a "threshold" image which can be viewed by pressing the "threshold" button in the bottom right hand corner. Black/grey pixels will be counted as spots if the number of neighbouring pixels (plus itself) exceeds the min_spot_size parameter. Using the default parameters, the CSPAD image does not look good, counting most of the background pixels as spots.
(example of threshold image before playing around with DIALS spot-finding parameters)
Adjusting the parameters
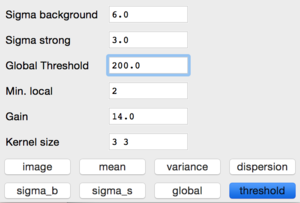
The parameters need adjusting to pick up the correct spots on the image. The CSPAD has a gain of 14, so this should be set first. Type "14" into the gain box and press "enter". For reference, the SACLA detector (MPCCD) is usually set to a gain of 10.
The next parameter to adjust is the global threshold. Try a global threshold of 100, 200 or 300.
These are the parameters you want to change.
These are the spots you want to see on the "threshold" image, with the minimum noise possible while still picking up as many spots as possible.
After fiddling with the parameters, one can create a find_spots.options file from the results:
gain=14 global_threshold=200 min_spot_size=2
Sometimes one may wish to include a minimum/maximum resolution cutoff although it is not necessary for the test data set, e.g.
filter.d_min = 1.6
filter.d_max = 30
Running a trial image
You can run DIALS using the cppxfel spot-finding scripts on a single image:
cppxfel.run_dials shot-s00-20130316171711930.pickle index=no
This will produce a _shot-s00-20130316171711930_strong.pickle file which you can check by loading back into dials.image_viewer:
dials.image_viewer shot-s00-20130316171711930.pickle _shot-s00-20130316171711930_strong.pickle
This way, you can check your spot-finding parameters on one or a number of other images, before scaling up.


